1. Generative 3D
Hello World (now in 3D)!

SuperRatings, Abe Pazos, 2013
"Das immer gegenwärtige Zufallselement im künstlerischen Erzeugungsprozeß erfaßt die generative Graphik modellmäßg durch den Einbau von Zufallsgeneratoren in die Programme. [. . .] Die Zufallsgeneratoren beteiligen sich an der Strukturierung der generierten Information, schaffen dabei unvorhersehbar Neues und erweisen sich dadurch als die zweite schöpferische Instanz neben dem Programmierer . . ." Georg Nees
Lesen: 3D in Processing
3D in Processing
In Teil 1 von ›Creative Programming‹ haben wir uns ausschließlich in der 2-dimensionalen visuellen Welt bewegt. Processing bietet Funktionen zum Umgang mit 3-dimensionalen Objekten und Szenen.
Zunächst muss im setup()-Block durch die Funktion size() der Render-Modus auf 3D gesetzt werden:
void setup() {
  size(200,200,P3D);
}
Zunächst ist es möglich, die Parameter der bereits bekannten Funktionen line() oder point() um z-Koordinaten zu erweitern und sie so im Raum zu positionieren.
Beispiel: 3D Coordinates
float camRadius = 400;
float polAngle = 0;
float aziAngle = 0;

void setup(){
  size(690,400,P3D);
  stroke(255);
}

void draw(){
  background(0);
  lights();
  rotateX(PI/2);
  rotateZ(-PI/6);
  line(-100, -100, -100, 100, -100, -100);
  line( 100, -100, -100,   0,    0,  100);
  line(   0,    0,  100, 100, -100, -100);
  line( 100, -100, -100, 100,  100, -100);
  line(  100,  100, -100,  0,    0,  100);
  line(  0,    0,  100, 100, 100, -100);
  line( 100, 100, -100, -100, 100, -100);
  line( -100, 100, -100,  0,   0,  100);
  line(  0,   0,  100, -100,  100, -100);
  line(-100,  100, -100, -100, -100, -100);
  line(-100, -100, -100 ,  0,    0,  100);

  float viewPointX = camRadius * cos(polAngle) * sin(aziAngle);
  float viewPointY = camRadius * sin(polAngle)* sin(aziAngle);
  float viewPointZ = camRadius * cos(aziAngle);

  camera(viewPointX, viewPointY, viewPointZ, 0, 0, 0, 0, 1, 0);
  polAngle += 0.01;
  aziAngle += 0.02;
}
Wie wir gleich sehen werden gibt es jedoch sinnvollere Möglichkeiten, dreidimensionale Objekte in Processing zu zeichnen, als sie mit der line()-Funktion zusammenzubauen. Einfache 3D-Objekte wie Quader und Kugeln können mit den Befehlen box() und sphere() erstellt werden:
Beispiel: Basic Shapes
size(690,400, P3D);
background(255);
lights();
fill(200);
stroke(100);
translate(100,200,-200);
box(200);
translate(400,0,0);
sphere(150);
Transforms
Lesen:
Kapitel 2D-transforms der Tutorials auf der processing-Website.
Bei obigem Beispiel fällt auf, dass der box()-Funktion keine x,y,z-Parameter übergeben werden. Diese Koordinaten werden zuvor durch die Funktion translate(x,y,z)definiert und der "Zeichenpunkt" an diese Position gesetzt. Um 3D-transforms zu verstehen empfiehlt es sich, zuerst das Tutorial 2D-transforms, das auf der Processing-Website verfügbar ist, zu lesen.
- Transformationen werden erst zu Beginn des nächsten Durchlaufs des draw-Loops zurückgesetzt.
- Innerhalb eines Loop-Durchlaufs addieren sich mehrere aufeinanderfolgende Transformationen.
- Neben translate() gibt es die Transformationen rotateX(winkel), rotateY(winkel), rotateZ(winkel),scaleX(winkel), shearX(winkel), shearX()
- Winkel werden in Radians angegeben
Matrix Stack
Häufig möchte man Transformationen nur auf einzelne Elemente anwenden. Translationen addieren sich normalerweise jeweils bis zum Ende des draw-Loops. Schreibt man bspw. zwei mal eine Rotation um 30 Grad, so addiert sich diese auf:
Beispiel: Transformationen & Matrix
size(690,200);
background(255);
translate(345,100);
rotate(PI/6);                // Rotationen werden in Radians angegeben
rect(0, 0, 50, 50);
rotate(PI/6);
rect(0, 0, 50, 50);
rotate(PI/6);
rect(0, 0, 50, 50);
rotate(PI/6);
rect(0, 0, 50, 50);
rotate(PI/6);
rect(0, 0, 50, 50);
rotate(PI/6);
rect(0, 0, 50, 50);
rotate(PI/6);
rect(0, 0, 50, 50);
rotate(PI/6);
rect(0, 0, 50, 50);
size(690,200);
background(255);
fill(0,40);
translate(345,100);
for (int i = 0; i <= 7; i++){
  pushMatrix();                // den aktuellen Stand der Transformationen zwischenspeichern
  rotate(PI/6);                // Rotation durchführen
  rect(0, 0, 50, 50);
  popMatrix();                 // den oben Zwischengespeicherten Zustand wiederherstellen
}
Dazu kann der aktuelle Zustand des Ausgabefensters mit dem Befehl pushMatrix() "abgelegt" werden. Dann erfolgen Transformationenen wie Translation, Rotation, etc., die sich stets auf die nachfolgend gezeichneten Elemente auswirken.
Exercise 1 (15 minutes): Write a for-loop that generates 100 individual (size, colour) Objects in 3D-space.Use the functions random() or randomGaussian() and translations.
Komplexere Formen mit PShape
Tutorial zu PShape, das auf der Processing-Website verfügbar ist.
PShape, createShape(), BOX, …, GROUP
Mit createShape() wird eine neue Form erstellt, die später mit der shape()-Funktion gezeichnet werden kann. Die Formentypen ELLIPSE, RECT, ARC, TRIANGLE, SPHERE, BOX, QUAD, und LINE stehen zur Verfügung. Es lassen sich Gruppen von einfachen Formen erstellen, die komplexere Objekte ergeben.
beginShape()
Beispiel: Generative 3D-Form aus einfachen Grundformen
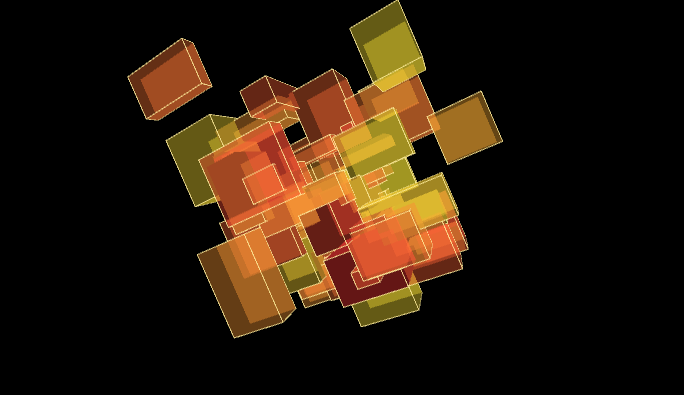
// Press 'c' to make new cluster
float theta = 0.0;

PShape cluster;

void setup(){
  size (690,400,P3D);
  lights();
  colorMode(HSB);
  stroke(35,100,255, 150);
  cluster = createShape(GROUP);
  makeCluster();
}

void draw(){
  background(0);
  theta += 0.01;
  translate(width/2, height/2, 0);
  rotateX(theta);
  rotateY(theta*2);
  rotateZ(theta*3);
  shape(cluster);
}

void keyPressed(){
 if(key == 'c'){
    cluster = createShape(GROUP);
    makeCluster();
 }
}

void makeCluster(){

  for(int i = 0; i < 60; i++){
    fill(random(0,40), 200, 255, 100);
    float h = random(10,80);
    float w = random(10,80);
    float d = random(10,80);
    PShape cube = createShape(BOX, h, w, d);
    cube.translate(randomGaussian()*50, randomGaussian()*50, randomGaussian()*50);
    cluster.addChild(cube);
  }
}

Georg Nees, 8-ecke, 1960er Jahre.
Exercise 2(30 minutes, finish it at home for next lecture):
Create a three-dimensional version of "8-ecke", a classic work of generative graphic by Georg Nees:
- generate 8 points in 3D-space
- connect these points to biuld a 3D-object (boxes, shapes, PShapes, vertexes,…)
- generate a matrix (14 X 19) of instances of these generative objects
float theta = 0.0;
int totalShapes = 8;
int totalPoints = 50;
float scaling = random(30, 100);

float[] pointX = new float[totalPoints];
float[] pointY = new float[totalPoints];
float[] pointZ = new float[totalPoints];

void setup() {
  size(690, 400, P3D);
  colorMode(HSB);
  //theta += 0.01;

  background(255);
  lights();
  translate(width/2, height/2, 0);
  setPoints();
  makeObject();
}

void draw() {
  background(50);
  theta += 0.01;
  translate(width/2, height/2, 0);
  rotateX(theta);
  rotateY(theta);
  makeObject();
}

void makeObject(){
  beginShape(TRIANGLES);
  for(int i = 0; i < totalPoints-2 ; i ++){
    fill(205+i, 200, 100, 100);
    stroke(255,50);
    vertex(pointX[i], pointY[i], pointZ[i]);
    vertex(pointX[i+1], pointY[i+1], pointZ[i+1]);
    vertex(pointX[i+2], pointY[i+2], pointZ[i+2]);
  }
  endShape();
}

void setPoints(){
  for(int i = 0; i < totalPoints ; i ++){
    pointX[i] = randomGaussian()*scaling;
    pointY[i] = randomGaussian()*scaling;
    pointZ[i] = randomGaussian()*scaling;
  }
}

void mousePressed(){
  setPoints();
}
Kamera
Als Ergänzung zur camera()-Funktion von Processing liefert die Library PeasyCam eine leicht zu konfigurierende Kameraansicht inklusive Maussteuerung der Kamera "out of the box".
Ein gutes Tutorial zu PeasyCam findet sich hier.
import peasy.*;
PeasyCam cam;

void setup(){
   cam = new PeasyCam(this, 0, 0, 0, 0);
}
…
Die Parameter von PeasyCam
Funktionen von PeasyCam sind unter anderem:
- Die Funktion
lookAt(x,y,z);erlaubt es, PeasyCam auf einen bestimmten Ort im Raum ausrichten setMinimumDistance– kleinstmöglicher ZoomfaktorsetMaximumDistance– größtmöglicher ZoomfaktorsetDistance(double d)rotateY(double angle)lookAt(double x, double y, double z)
Kugelkoordinaten / Sphärische Trigonometrie
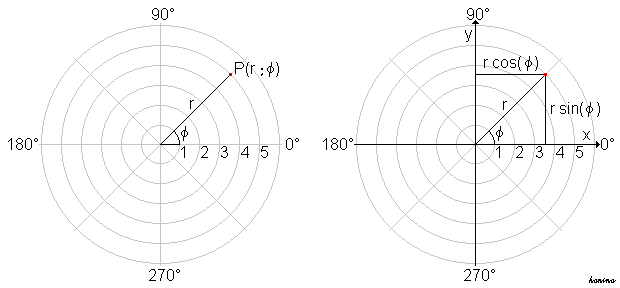
In Teil 1 der Lehrveranstaltung haben wir die Funktionen sin(), cos() und tan() und die für Kreisberechnungen verwendeten trigonometrischen Formeln für zweidimensionale Berechnungen kennengelernt. Wir haben die x,y-Koordinaten eines Punktes, der sich auf einem Kreis befindet, durch Verwendung der Polarkoordinaten berechnet:
x = mittelpunktX + (radius * cos(winkel));
y = mittelpunktY + (radius * sin(winkel));
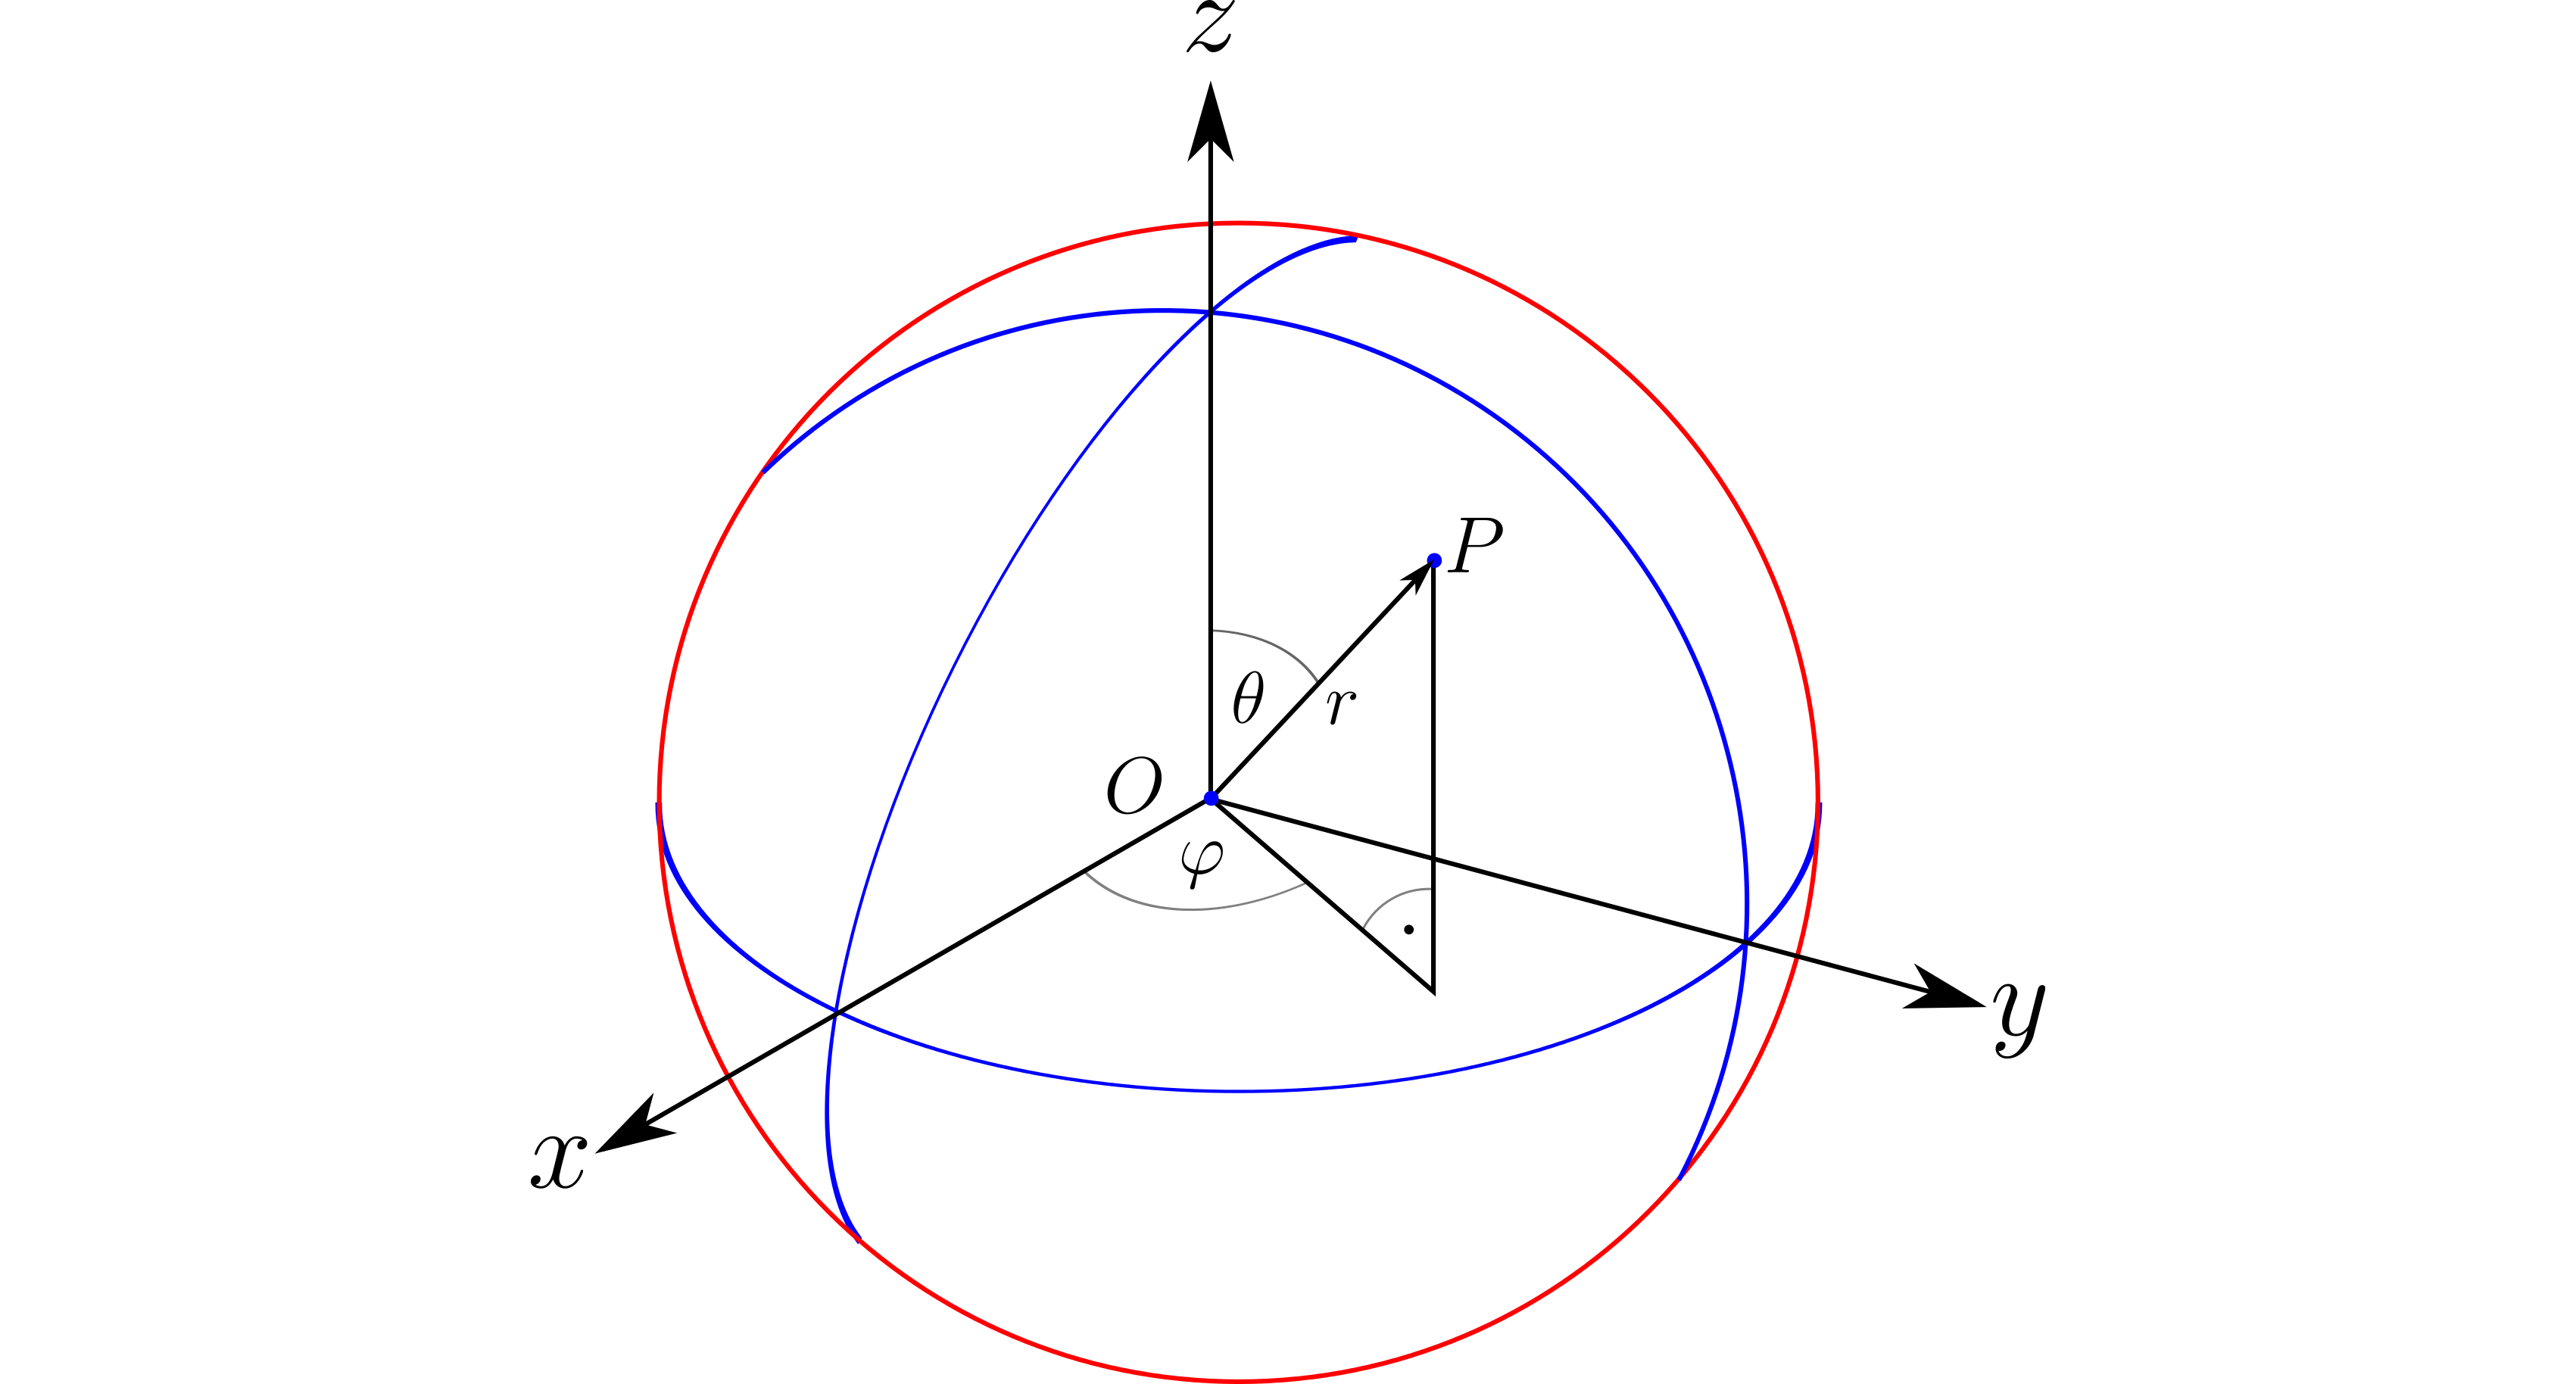
Kugelkoordinaten sind, ausgehend von einem Mittelpunkt, durch Radius und die beiden Winkel θ und φ auf der Kugeloberfläche definiert. Denkt man den Mittelpunkt als Betrachter*in, so wird die Bedeutung von Kugelkoordinaten für die Positionierung von Objekten in Virtual- und Mixed-Reality deutlich.
"Mathematisch gesprochen, wird jedem Koordinatentripel ( r , θ , φ )ein Punkt im dreidimensionalen euklidischen Raum zugeordnet (Parametrisierung). Wählt man ein kartesisches Koordinatensystem (bspw. notwendig für das Sketchausgabefenster), so kann die Zuordnung durch die folgenden Gleichungen beschrieben werden:"
x = r ⋅ sin θ ⋅ cos φ
y = r ⋅ sin θ ⋅ sin φ
z = r ⋅ cos θ
Der Winkel θ kann dabei Radian-Werte von 0 bis PI (0 bis 180 Grad) aufweisen.
Der Winkel φ weist Radian-Werte von -PI bis +PI (-180 bis 180 Grad) auf.
Beispiel: Random Points auf Kugel
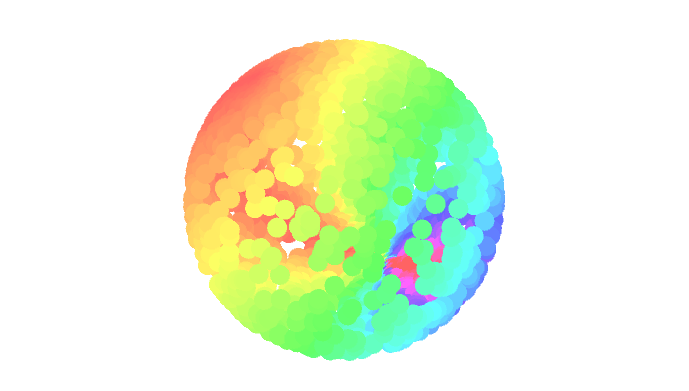
// Taste 'w': Viewpoint außerhalb der Kugel
// Taste 'c': Viewpoint im Mittelpunkt der Kugel

import peasy.*;

PeasyCam camera;
int amount = 2000;
float angleX[], angleY[];
float radius;
float x, y, z;
int centerX = 0;
int centerY = 0;
int centerZ = 0;

void setup(){
  size(690, 400, P3D);
  colorMode(HSB);
  radius = 200;
  angleX = new float[amount];
  angleY = new float[amount];
  camera = new PeasyCam(this, 0, 0, 0, 500);
  background(255);
  strokeWeight(20);
  fill(0,50);
  makePoints();
}

void draw(){
  background(255);
  makeObjects();
}

void makePoints(){
  for (int i = 0; i < amount; i++){
      angleX[i] = random(-PI, PI);
      angleY[i] = random(0, PI);
  }
}

void makeObjects(){
  for (int i = 0; i < amount; i++){
    x = centerX + radius * sin(angleY[i]) * cos(angleX[i]);
    y = centerY + radius * sin(angleY[i]) * sin(angleX[i]);
    z = centerZ + radius * cos(angleY[i]);
    pushMatrix();
    translate(x,y,z);
    stroke(abs(angleY[i] * angleX[i])*30, 155,255);
    //sphere(5);
    point(0,0,0);
    popMatrix();
  }
}

void keyPressed(){
  if(key == 'c'){
     camera.setDistance(0);
  }else if (key == 'w'){
    camera.setDistance(500);
  }
}
Vertex & Bezier-Vertex
Mit der Funktion bezier() lassen sich 2- und 3-dimensionale Bezierkurven zeichnen. Die übergebenen Parameter definieren die x-, y- und z-Koordinaten von 4 Punkten der Bezierkurve: Startpunkt, erster Bezierpunkt, zweiter Bezierpunkt, Endpunkt.
bezier(x1, y1, z1, x2, y2, z2, x3, y3, z3, x4, y4, z4);
Beispiel: Bezierkurven
float p1x = 20;
float p1y = 100;
float p2x = 150;
float p2y = 0;
float p3x = 690-150;
float p3y = 200;
float p4x = 690-20;
float p4y = 100;
float yNoise1 = 0;
float yNoise2 = 1;

String mode = "perlin";

void setup() {
   size(690, 200);
   ellipseMode(CENTER);
   stroke(255);
   strokeWeight(20);
}

void draw() {
   background(0);
   fill(255);
   text("'m' for mouse interaction; 'p' for perlin noise",20,20);
   noFill();
   if (mode == "mouse"){
     p3x = mouseX;
     p3y = mouseY;
   } else if (mode == "perlin") {
     p2x = 250;
     p3x = 690-250;
     yNoise1 += 0.003;
     yNoise2 += 0.01;
     p2y = 100+(noise(yNoise1)-0.5)*(height*2);
     p3y = 100+(noise(yNoise2)-0.5)*(height*2);
   }
   bezier (p1x, p1y, p2x, p2y, p3x, p3y, p4x, p4y);
}

void keyPressed(){
   if(key == 'm'){
      mode = "mouse";
   }else if(key == 'p'){
      mode = "perlin";
   }
}
Beispiel: Bezierkurven von Punkten auf Kugeloberfläche
float angleX1[], angleY1[], angleX2[], angleY2[];
float angle1[], angle2[];
float radius1;
float radius2;
int amount = 400;
float x1,y1,z1,x2,y2,z2;
float anchor1X, anchor1Y, anchor2X, anchor2Y;
float bezier1Y, bezier1Z, bezier2Y, bezier2Z;
float bCenter1Y, bCenter1Z, bCenter2Y, bCenter2Z;
float theta;

void setup(){
   size(690, 400, P3D);
   colorMode(HSB);
   lights();
   ambientLight(255,255,0);
   radius1 = 200;
   radius2 = 200;
   anchor1X = 50;
   anchor1Y = height/2;
   anchor2X = width-50;
   anchor2Y = height/2;
   bCenter1Y = height/2;
   bCenter1Z = 0;
   bCenter2Y = height/2;
   bCenter2Z = 0;
   theta = 0;
   angle1 = new float[amount];
   angle2 = new float[amount];

   background(0);
   noFill();
   stroke(255,40);
   strokeWeight(1);
   makePoints();
}

void draw(){
  background(0);
  translate(345,0,200);
  rotateX(-PI/16);
  rotateY(PI/2.5);

  drawPaths();
}

void drawPaths(){
  theta += 0.01;
  anchor1X = sin(theta)*200;
  anchor2X = width-sin(theta)*200;
  for (int i = 0; i < amount; i++){
    angle1[i] += 0.01;
    angle2[i] -= 0.03;
    bezier1Y = bCenter1Y + (radius1 * cos(angle1[i]));
    bezier1Z = bCenter1Z + (radius1 * sin(angle1[i]));
    bezier2Y = bCenter1Y + (radius2 * cos(angle2[i]));
    bezier2Z = bCenter1Z + (radius2 * sin(angle2[i]));
    bezier(anchor1X, anchor1Y, 0, 50, bezier1Y, bezier1Z, width-50, bezier2Y, bezier2Z ,anchor2X, anchor2Y, 0);
  }
}

void makePoints(){
  for (int i = 0; i < amount; i++){
    angle1[i] = random(1,3);
    angle2[i] = random(4,6.5);
  }
}
Licht
To add more depth to your sketch, you’ll need to turn on the lights in your sketch by using the lights() function. To get the best result, you also need to turn of strokes with the noStroke() function. The light will add shadows to your objects and they will look more like real 3D shapes.
Lesen:
ambientLight()
spotLight()
Materialeigenschaften und Texturen
- Glanz – shininess()
- Ausstrahlende Farbe – emissive()
- Farbe der Reflektion – specular()
Beispiel: Generatives Objekt mit Texturen

// Press 'c' to make new cluster
// Press 'i' and 'v' to toggle texture between image and video

import peasy.*;
import processing.video.*;

PeasyCam cam;
Capture video;
PImage tex, used;

PShape globe;
PShape cluster;

void setup(){
  size (690,400,P3D);
  cam = new PeasyCam(this,0,0,0,400);
  tex = loadImage("magritte.jpg");
  video = new Capture(this, 800, 600);
  video.start();
  lights();
  fill(255,155);
  stroke(255,50);
  used = tex;
  cluster = createShape(GROUP);
  makeCluster();
}

void draw(){
  background(255);
  shape(cluster);
}

void keyPressed(){
 if(key == 'c'){
    cluster = createShape(GROUP);
    makeCluster();
 }else if(key == 'i'){
    used = tex;
    cluster = createShape(GROUP);
    makeCluster();
 }else if(key == 'v'){
    used = video;
    cluster = createShape(GROUP);
    makeCluster();
 }
}

void makeCluster(){
  for(int i = 0; i < 60; i++){
    float h = random(10,80);
    float w = random(10,80);
    float d = random(10,80);
    PShape cube = createShape(BOX, h, w, d);
    cube.translate(randomGaussian()*50, randomGaussian()*50, randomGaussian()*50);
    cube.setTexture(used);
    cluster.addChild(cube);
  }
}

void captureEvent(Capture video) {
  video.read();
}
HE_Mesh und andere 3D Libraries
Es gibt für Processing einige Libraries, die das Leben in 3D erleichtern. Je größer der Funktionsumfang der Libraries ist, desto mehr Lernzeit muss jedoch meist auch investiert werden. Eine Library, die viele Möglichkeiten bietet ist HE_Mesh
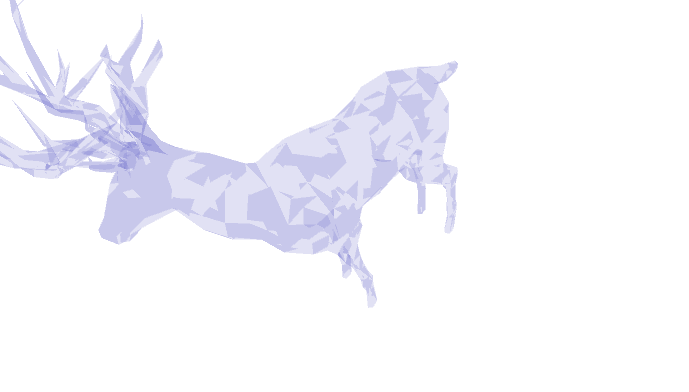
3D-Objekte importieren
Über das Objekt PShape lassen sich nicht nur, wie in Teil 1 der LV bereits gelernt 2D-Vektorgrafiken importieren, sondern auch 3D-Objekte in Processing laden. Mit der Funktion loadshape können 3D-Daten des Formats .OBJ, die im data-Ordner liegen genutzt werden.
import peasy.*;

PeasyCam cam;
PShape deer;

void setup(){
  size(690,400, P3D);
  cam = new PeasyCam(this, -300, 0, 0, 0);
  cam.setMinimumDistance(500);
  cam.setMaximumDistance(5000);
  deer = loadShape("deer.obj");
  deer.setFill(color(100,100,200,50));
  shapeMode(CENTER);
}

void draw(){
  background(255);
  translate(width/2, height/2);
  shape(deer, 0, 0);
}
3D-Objekte exportieren
In einem Processing-Sketch generierte 3D-Objekte lassen sich durch die Verwendung der Library OBJExport exportieren. Die Vorgehensweise ähnelt stark jener, die wir in Teil 1 der LV bereits beim Exportieren von PDFs kennengelernt haben. Ähnlich wie damals für ein PDF, so wird nun für eine 3D-Datei alles in diese Datei "aufgezeichnet", was im draw-Loop gezeichnet wird.
import nervoussystem.obj.*;

boolean record;

void setup() {
  size(400,400,P3D);
  smooth();
}

void draw() {
  background(0);

  if (record) {
    beginRecord("nervoussystem.obj.OBJExport", "filename.obj");
  }

  fill(255);
  box(100,100,100);
  translate(width/20, height/2);
  box(100,100,100);

  if (record) {
    endRecord();
    record = false;
  }
}

void keyPressed()
{
  if (key == 'r') {
    record = true;
  }
}
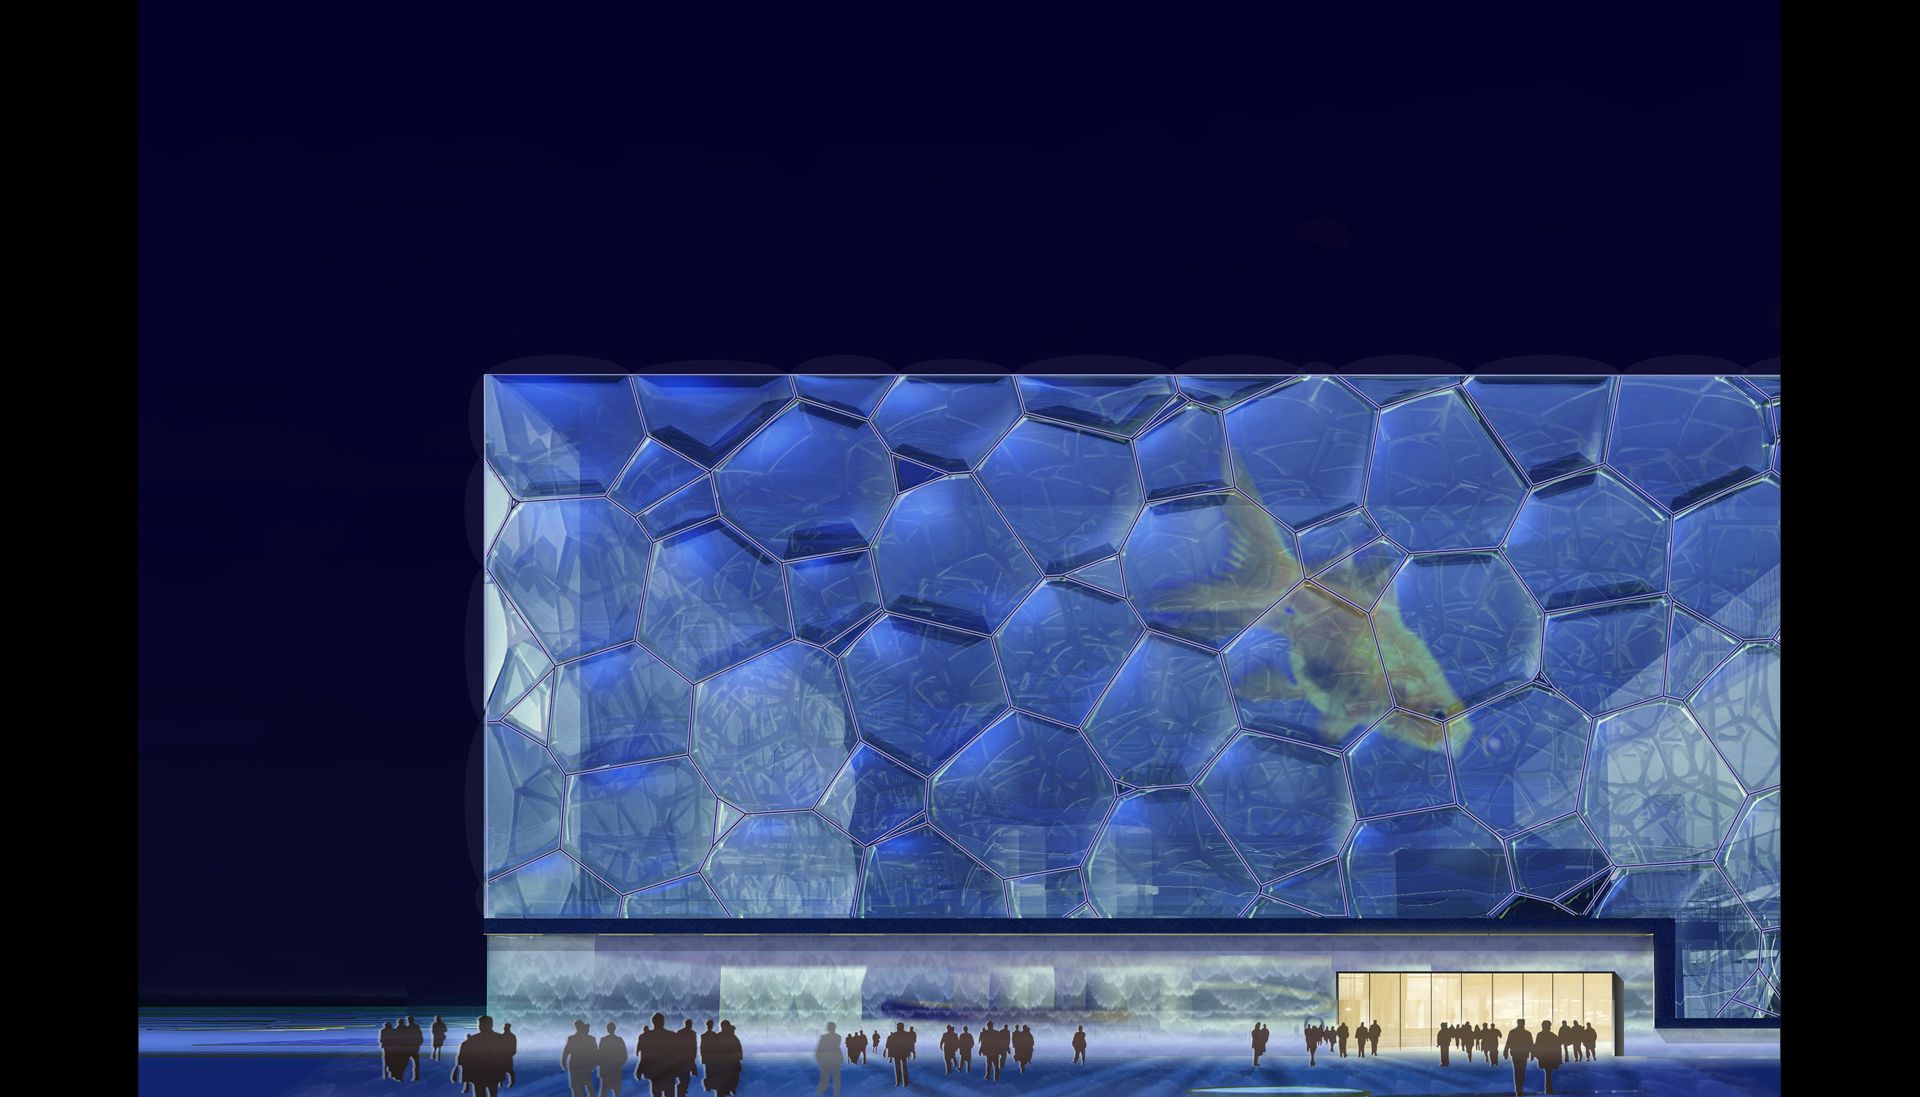
Die exportierten generativen 3D-Objekte können mit Software wie Cinema4D oder Blender weiterverarbeitet werden, mit 3D-Printern ausgedruckt werden oder für Architekturmodelle gelasert werden.
Beispiel: Generatives Design in der Architektur Beijing Water Cube
Beispiel: Generatives Design für Schmuck nervous system

Example: Visuals in 3D space
import peasy.*;
import ddf.minim.*;
import ddf.minim.analysis.*;

Minim  minim;
AudioPlayer player;
FFT fft;

PeasyCam cam;
PShape item;
PShape grid;
PVector beatShock;

ArrayList floaters;
int amount = 500;
Dandy d;

void setup(){
  size(800, 600, P3D);
  frameRate(60);
  minim = new Minim(this);                      // declare minim-Objects
  player = minim.loadFile("brownbeat.mp3");
  player.loop();
  fft = new FFT(player.bufferSize(), player.sampleRate());
  fft.logAverages(55, 1);      // Tiefster Ton: 55Hz (A1), 6 (Analyse-)Bänder pro Oktave

  cam = new PeasyCam(this, 0, 0, 0, 0);         // declare cam-Objects
  cam.setDistance(400);
  floaters = new ArrayList();
  for (int i = 0; i < amount; i++){
    floaters.add(new Dandy());
  }
  beatShock = new PVector(0,0,0);
}

void draw(){
  background(255);
  ambientLight(150, 150, 150);
  pointLight(255, 255, 255, 0, 0, 0);
  fft.forward(player.mix);
  float bassValue = fft.getBand(1);
  println(bassValue);
  if (bassValue > 30){
    //beatShock.set(10, 0, 0);
     bounce();
  }

  for (int i = 0; i < amount; i++){
    Dandy d = floaters.get(i);
    d.move();
    d.shock(beatShock);
    d.display();
    d.rotate();
  }

  if (beatShock.x > 0.5){
    beatShock.mult(0.9);
  }

  // Overlay for Display
  cam.beginHUD();
  fill(0);
  text(frameRate,10 ,10);
  cam.endHUD();
}


void keyPressed(){
 if(key == 'a'){
   cam.rotateY(0.1);
 }else if (key == 's'){
   cam.rotateY(-0.1);
 }else if (key == 'w'){
   cam.rotateX(-0.1);
 }else if (key == 'y'){
    cam.rotateX(0.1);
 }else if (key == 'b'){
   bounce();
 }else if (key == 'n'){
   shock();
 }else if (key == 'm'){
   spin();
 }
}

void shock(){
  beatShock.set(10, 0, 0);
}

void bounce(){
  double d = cam.getDistance();          // get the current distance of cam
  float selector = random(-1,1);         // random value to selct wether to zoom in or zomm out
  float jumpDist = random(100,200);      // distance of zoom
  if (selector > 0){                     //
    jumpDist = -jumpDist;
  }
  if (d < 1){                            // constrain cam zoom to 0 and 1000
    jumpDist = abs(jumpDist);
  }
  if (d > 1000){
    jumpDist = -abs(jumpDist);
  }
  double newDistance = d+jumpDist;      // calculate new distance
  cam.setDistance(newDistance, 20);     // set new distance
}

void spin(){
  //cam.rotateY();
}
class Dandy {
  float radiusPos, anglePos, altitudePos;
  PShape form;
  PVector velocity;
  PVector location;
  PShape cube;
  float distance;
  float opacity;
  float rotation;
  float dangling;

  Dandy(){
    location = new PVector(random(-1000,1000), random(-1000,1000), random(-1000,1000));
    velocity = new PVector(0, 1, 0);
    cube = createShape(BOX, random(20,100), random(20,100), random(20,100));
    rotation = random(0.005);
    dangling = random(0,005);
  }

  void move(){
    if(location.y > 1000){
      location.sub(0, 2000, 0);
    }
    location.add(velocity);
    distance = location.magSq();
  }

  void shock(PVector sAmount){
    location.add(sAmount);
  }

  void rotate(){
    cube.rotateY(rotation);
  }


  void display(){
    pushMatrix();
    translate(location.x, location.y, location.z);
    opacity = map(distance, 0, 1000000, 255, 0);
    cube.setFill(color(100,100,100, opacity));
    strokeWeight(0.5);
    cube.setStroke(color(200,200,200, opacity));
    shape(cube);
    popMatrix();
  }
}